Updated 04-April-15: I apologize for getting some of the initial information wrong. Feedburner is actually unnecessary. Mailchimp tends to change one's code in an attempt to be helpful, and I think this might have added some key CSS back into my template when I was testing Feedburner. Hence I mistakenly attributed the fix to Feedburner.
Why is it so hard to setup email newsletters for one's blog? I have been through the process with both Wordpress and Squarespace, using a plethora of tools, websites, and plugins. Each one claimed to do the job but very few worked adequetely or at all. If you're here I assume it's because you suffered the same disappointments.
I have a really hard time accepting that this is still where we're at in 2015. We're practically in a post-email era, where most things are shared via social networking sites. Heck, I sometimes get messages through Facebook and wonder why the individual didn't just email.
So in that case Squarespace, which prides itself on simplicity and inclusiveness, should have a built-in newsletter function right?
Wrong. But here's how to set it up.
1. Create a Mailchimp account.
(Sorry, but I'm not going to go into all the details here).
2. Create a Mailchimp (Subscriber) List.
Under Lists > Create List.
3. Add a Newsletter Block to your Squarespace Page.
Under Storage, choose the MailChimp List you made.
*A Note on Formatting*
The Mailchimp templates are setup to be 564px wide. However, images from your Squarespace RSS won't get resized to fit this format and instead will stretch your format up to their maximum width, which is pretty unmanageable for an email (especially on mobile). The images should really be getting the max-width attribute set by Mailchimp, but so far I haven't found a way to do that other than to add some CSS code manually
4. In Mailchimp, make a new RSS-Driven MCampaign
This is how you configure the settings:
RSS Feed URL: input the URL of your RSS feed (instructions here).
http://YOUR.ADDRESS.COM/BLOG?format=rss
Recipients: Select the List you created earlier. You probably want "Send to Entire List".
Setup: I have my campaign setup to email out one post a day. To have the email subject be the same as the Blog post's, use the following merge tag
*|RSSITEM:TITLE|*
I also personalize the to field with the recipient's name
*|FNAME|*
Set any of the tracking options as you like. I track opens and Google Analytics links.
Template: I based mine off of one of the Drag and Drop RSS-to-Email templates.
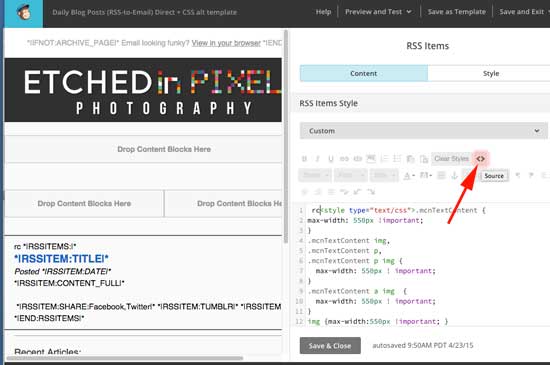
Design: It can be daunting to work with at first, but you'll get the hang of it eventually. In the body, I choose source editing <>. I use this code. This will send out your full post (the CONTENT_FULL) and a list of your recent posts.
<span>*|RSSITEMS:|*</span> <h2 class="null"><a href="*|RSSITEM:URL|*" target="_blank">*|RSSITEM:TITLE|*</a></h2> <em>Posted *|RSSITEM:DATE|*</em><br /> *|RSSITEM:CONTENT_FULL|*<br /> <br /> <span style="line-height:20.7999992370605px">*|RSSITEM:SHARE:Facebook,Twitter|* *|RSSITEM:TUMBLR|* *|RSSITEM:PLUSONE|*</span><br /> <span>*|END:RSSITEMS|*</span>
Required CSS
While still in code view <>, add the following CSS before the content above. Richard from SS forums was helpful in identifying the correct classes to select, while I have corrected the parameters (width was incorrect). The max-width parameter is actually key, as it will prevent images from being wider than the template. Replace 540px with whatever you want your width to be, I have mine set slightly smaller than the body, so that there is padding on the sides. The first line might not be necessary, but I tossed it in to make sure. The second line (.mcnTextContent) will make sure that Preformatted (ie Code/monospace styles in Squarespace) don't also screw things up.
<style type="text/css">
img,
.mcnTextContent ,
.mcnTextContent img,
.mcnTextContent p,
.mcnTextContent p img,
.mcnTextContent a img {
max-width: 540px !important;
}
</style>
You might still have a few issues, but this fixed most of them for me.
When you've got the look you want, choose Save as Template.
6. Done!
Confirm: This will do some final error check. You should probably send a few test emails to yourself and use Preview mode to confirm that everything works before you subject your subscribers to it. From here you can Save and enable the campaign.
If everything went well, you should be able to sit back and enjoy your newsletter!
Troubleshooting
Several visitors have mentioned that this method doesn't initially fix everything. I'm not really sure what is happening, but I think Mailchimp might be caching some data on their end. Here are some things to try:
- Try clearing your browser caches, and access Mailchimp or your email via Incognito (Chrome) or Private Browsing (Safari) mode.
- Duplicate the campaign and send a new test email.
- Enable the Campaign, and schedule it to go out the next day (but only to you).
- Write a new post to go out.
- Check the next day to see if is correctly formatted.
- It seems that most users are seeing positive results if they just wait a day.


